 |
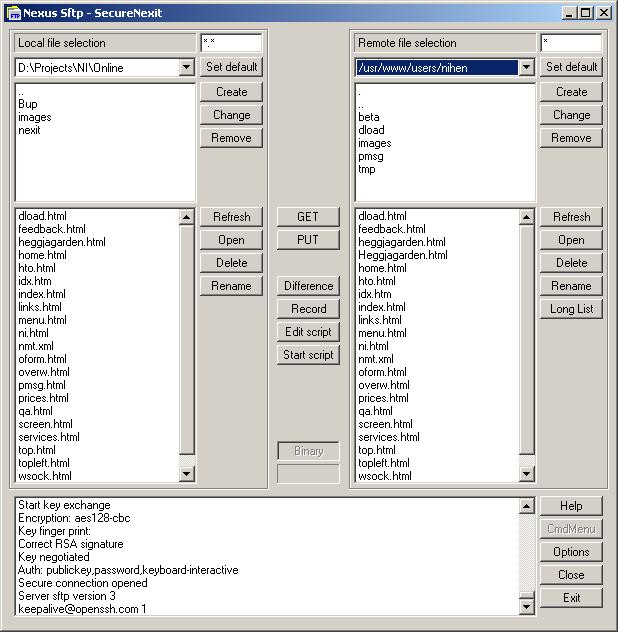
Nexus Terminal consists of a terminal emulator, a printer emulator and a ftp client. It has support for both normal telnet and secure connections, based on SSH and SSL, recording, scripting and HLLAPI. |
- Nexus FTP - 2.48
- Nexus Printer - 5.60
- Nexus Terminal - 7.78
- Session setup, fonts, cursor, mouse and scripting
- Please contact Nexus Integration if you have some tips or advice to this page.
Nexus Terminal session configurations are kept/saved in files with the extension .nmt. The file name is the same as the session name. The session file consists of all needed information to establish the terminal connection. Host name, port, emulation type, translation tables, color, font, etc, are all included in that file. The session files are stored in the Nexus installation directory or in $APPDATA\NexusIT, $USERPROFILE\NexusIT or $HOMEPATH\NexusIT. A session can be opened from the file menu or from the setup dialog. It can also be used as a parameter to the executable program of Nexus Terminal (nmt.exe), like: "C:\Program File\NexusIT\nmt.exe" "C:\Program File\NexusIT\mainf.nmt"
 |
Session files are created, changed, opened and removed in the session setup dialog. The basic part of the session is
host name (IP address), port, communication protocol (telnet, SSH or SSL), emulation
type (3270, 5250 or VT/ANSI), terminal name and type, translation table are set in this dialog.
Other parts of the session, like font, color, and file transfer setup are kept in separate setup dialog. There is also a
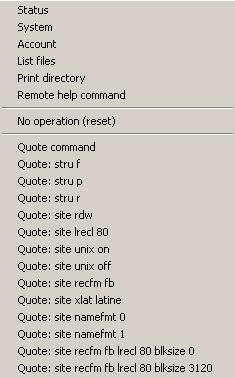
setup dialog called Miscellaneous, which includes minor changes to the default setup. If the check box called Remove Session button is check, then the remove button will be available to remove session files, which is not needed any more. SSH (Secure Shell) and SSL (Secure Socket Layer) is configured in the Security Setup dialog. The Telnet command Timing Mark is used as a "keep alive" mechanism by some hosts to keep the telnet connection open. If it's checked, then it will send positive reply to a request, else it will send a negative reply. If Socket keep alive is checked, then socket (TCP/IP) keep alive will be set on the connection. Routers in between your PC and the host/server can disable this option. If Telnet keep alive is checked, then a telnet command called "No operation" is sent each 20 second. Please keep these three options unchecked as a default setup. |
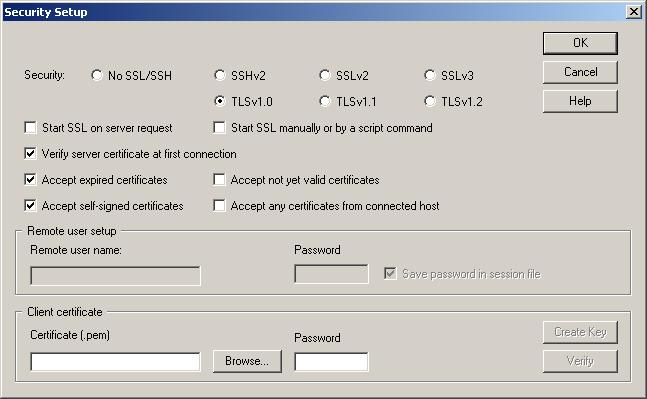 |
The security setup dialog is used with both SSH and SSL setup. Options which are not related to the selected mode will be disabled. SSL certificates must be OpenSSL/pem formatted and SSH private keys must be OpenSSH formatted. The ssh utility ssh-keygen can be used or the included private/public key generator (opened from the Create Key button). |
Nexus Terminal supports both bitmap and TrueType, Ansi and OEM fonts, but the TrueType fonts must support a fixed scaled size.
The cursor can be a rectangle or underscore, with blinking on or off. The shape and blinking is set in the Display Setup dialog. It has two different colors, which can be set in the Color Setup dialog. It's the cursor background and the text color. The Display Setup dialog includes also the Hotspot and Rule line setup. A hotspot consist of a text string, and a corresponding operation, which can be an attention key or a script file. If no script files has been created, only the attention keys are available for the hotspot text. The hotspot control can also be enabled and disables from the view menu. The hotspot text color is changed and a new cursor is displayed when the cursor is moved over a hotspot text area. And the hotspot operation is selected with the left mouse button.
The left mouse button is default configures to, move the cursor (3270/5250 emulation) and to select a screen area/text. The other mouse buttons must be configured in the Mouse Setup dialog. If no operation has been configured for the right mouse button, then it will show a popup menu when it's pressed. But it can be configured to do operations like, copy to clipboard, print, select all and several other operations.
Top
Each script functions is also documented in the help file included. This section will include some tips on how to use them.
A nexus script file consists of one or more script functions. It's a normal text file, which can be edited by a text editor like Notepad. The script functions are executed one at the time. The script engine will normally execute the next script function as soon as it has finished the current script function, so flow control is very important. The script function WaitFor is used to delay the execution of the next script function until some state has been changed. After the script function FunctionKey (ENTER) has been executed, the keyboard is locked, until some response has been received from the remote host. The script function WaitFor (UNLOCK) will delay the execution of the next script function until the lock switch has been turned off.
This script file will open a session, do the logon and type the string "abc" into the second screen image:
OpenSession ("C:\Program Files\NexusIT\ibm.nmt")
WaitFor (CONNECT)
WaitFor (UNLOCK)
# The cursor is now in the user name input field
TypeString ("name")
FunctionKey (TAB)
TypeString ("password")
FunctionKey (ENTER)
WaitFor (UNLOCK)
TypeString ("abc")
# End of script
Other flow control functions are: WaitForText, WaitForTimer and WaitForCursorPos.
The Nexus script engine has also support for while-loops and if-statements like:
While TextInImage ("MORE INFO")If and while statements can be nested, but the SetLabel and GoToLabel can also be used to build while-loops within an other while loop like:
# Other script functions
CaptureImage ()
FunctionKey (ENTER)
EndDo
If TextInImage ("END OF TEXT")
StopCapture ()
StartApplication ("notepad cap.txt")
EndIf
NumberItem (ABC)
# Number variable ABC set equal to zero While NumberItemLessThan (ABC, 10)
# Other script functions
IncNumberItem (ABC)
EndDo
OpenTextFile ("C:\temp.txt")
# The text file is opened at this point, else the script would have be terminated
# Default text item separator is ",\t\n"
While ReadTextLine ()
SetLabel ("Next_Item")
# The script file is preprocessed, so this statement will not be added for each iteration
# GotoLabel statement can even be included before the corresponding SetLabel
If GetNextItem ()
# Next item successfully # do what you want with the text stored in TEXT_ITEM
GoToLabel ("Next_Item")
EndIf
# At this point the while loop will continue with the next line
EndDo
# All lines has been parsed, so close the text file
CloseTextFile ()
The same script with two while loops:
OpenTextFile ("C:\temp.txt")
While ReadTextLine ()
While GetNextItem ()
# Do what you want with the text stored in TEXT_ITEM
EndDo
# At this point the while loop will continue with the next line
EndDo
# All lines has been parsed, so close the text file
CloseTextFile ()
If ReadTextFile or GetNextItem is not included within a if test or a while loop, then the script will terminate when the return value is false. GetNextItem will default not return empty text items. But the script function AcceptEmptyItems (TRUE), will make it return empty items until there is no more items.
This script does no terminal emulation. It just demonstrates some options with reading and writing to files.
OpenTextFile ("C:\temp\sample.cvs")
SetTextToken (";\t\r\n")
If FileExist ("C:\temp\outp.txt")
RemoveFile ("C:\temp\outp.txt")
EndIf
OpenOutputFile (0, "C:\temp\outp.txt")
AcceptEmptyItems (TRUE)
NumberItem (NC)
StringItem (NAME)
while ReadTextLine ()
if GetNextItem ()
if IsStringItemNotEmpty (TEXT_ITEM)
CopyStringItem (NAME, TEXT_ITEM)
GetNextItem ()
# Not needed/tested
GetNextItem ()
if IsStringItemNotEmpty (TEXT_ITEM)
WriteItemToFile (0, NAME)
AppendTabToFile (0)
WriteItemToFile (0, TEXT_ITEM)
AppendNewLineToFile (0)
IncNumberItem (NC)
endif
endif
endif
EndDo
CloseTextFile ()
CloseOutputFile (0)
PopUpMsg (NC)
Nexus Terminal has support for script recording. It will generate a script file based on the user input.
Top
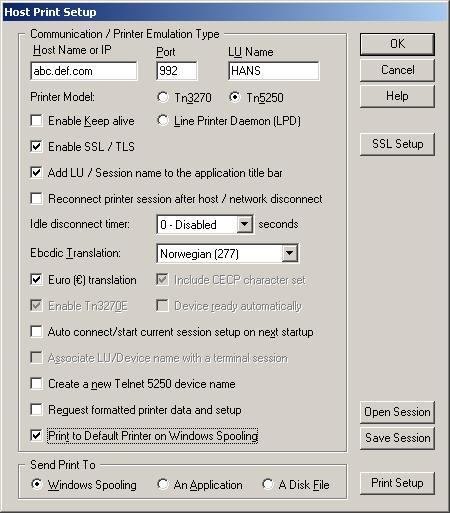
Nexus Printer session configurations are kept/saved in files with the extension .nmp. The file name is the same as the session name. The session file consists of all needed information to establish the printer connection.
The mainframe (z/OS) setup for telnet 3270 print is provided by John Baker.
These examples assume understanding the configuration of the z/OS mainframe telnet server for TN3270 processing. This is from the z/OS V1R5.0 Communications Server IP Configuration Reference and is a good reference.
The following example maps a group of printers to an IP Address range.
PRTGROUP PGROUP1
         TPRTTEST
         TPRTTSTA..TPRTTRPG..FFFFFFFA
         TPRTTST1..TPRTTST5..FFFFFFFN
ENDPRTGROUP

IPGROUP  IPGROUP1 192.168.0.2..192.168.0.15        ENDIPGROUP

PRTMAP   PGROUP1  IPGROUP1 SPECIFIC
Using SPECIFIC in the PRTMAP definition ensures that the same Printer LU will always be assigned to the workstation TN3270 print session. It requires the LU Name to be coded in
the Host Print Setup and Enable Tn3270E must be checked. This method is useful where a group of workstations is in a DHCP scope but will require the same Printer LU each
time a printer session is opened on the same workstation. For example, when the workstation obtains any address in the IP Group, and has specified the Printer LU in the Host Print Setup,
that LU will be always be assigned as a printer to that workstation.Another use of this configuration is to assign it to a remote access/dial up pool where each modem in the pool of modems obtains an IP Address from the range of addresses. The behavior is the same as the assignment of IP Addresses from a DHCP server. Incorporating TN3270 display sessions, the entire configuration would look as follows:
LUGROUP TGROUP1
         TERMTEST
         TERMTSTA..TERMTRPG..FFFFFFFA
         TERMTST1..TERMTST5..FFFFFFFN
ENDLUGROUP

PRTGROUP PGROUP1
         TPRTTEST
         TPRTTSTA..TPRTTRPG..FFFFFFFA
         TPRTTST1..TPRTTST5..FFFFFFFN
ENDPRTGROUP

IPGROUP  IPGROUP1 192.168.0.2..192.168.0.15        ENDIPGROUP

LUMAP    TGROUP1  IPGROUP1
PRTMAP   PGROUP1  IPGROUP1 SPECIFIC
This example maps a group of printers to a single IP Address.
PRTGROUP PGROUP2
         TPRTTEST
         TPRTTSTA..TPRTTRPG..FFFFFFFA
         TPRTTST1..TPRTTST5..FFFFFFFN
ENDPRTGROUP

PRTMAP   PGROUP2  192.168.0.16 SPECIFIC
In this example, you can turn a workstation into a mainframe print server by running multiple TN3270 printer clients on the same machine/IP Address and connecting each of them to a
Windows printer. The number of active session is limited by the numbers of printers Windows will allow to be defined and any workstation resource limitations for running multiple
instances of the TN3270 printer client (Memory, CPU). Another use for the above configuration is when Port Overload routing is configured for network traffic (See the white paper
article called Port Address Translation).In this example the mainframe will see multiple requests for the telnet port on IP Address 192.168.0.16, each port being associated with a different requesting workstation. Again, using SPECIFIC in the PRTMAP definition requires the LU Name to be coded in the Host Print Setup. Enable Tn3270E must be checked. Incorporating TN3270 display sessions, the entire configuration would look as follows:
LUGROUP TGROUP2
         TERMTEST
         TERMTSTA..TERMTRPG..FFFFFFFA
         TERMTST1..TERMTST5..FFFFFFFN
ENDLUGROUP

PRTGROUP PGROUP2
         TPRTTEST
         TPRTTSTA..TPRTTRPG..FFFFFFFA
         TPRTTST1..TPRTTST5..FFFFFFFN
ENDPRTGROUP

LUMAP    TGROUP2  192.168.0.16
PRTMAP   PGROUP2  192.168.0.16 SPECIFIC
TopTop